Saturday, 21 December 2019

Microsoft Teams List (Part II) – Building End-user interface on PowerApps to identify Membership Information

Let us see how to create an interface on Power Apps platform, listing down all the teams under office 365 Microsoft teams tenant, also enable options to join the team if user is already not a member.

In the previous article, we have seen the ways to identify the user membership information via Microsoft Graph API. Using these Graph API and information, we will build the user interface functionality.

Here, a simple app is built for end-users on Power Apps platform, which in turn connects to Microsoft Graph API data explained in the previous article. The below snapshot shows the end result.
Microsoft Teams List - Options showing if user is member of /or join team button
Microsoft Teams List - Options showing if user is member of /or join team button 

Microsoft Teams List (Part I) – Exploring MS Graph API to find the Teams membership information on Office 365 Groups

In the Microsoft teams, there is a way to find public teams, and also private teams if discovery option is enabled on the tenant wide settings.

But is it possible to see all teams irrespective of discovery option on the Microsoft teams tenant? Answer is yes, there is a way for administrators with Microsoft graph API, and building some app interfaces showing the teams list with the help of graph API.

To create the necessary interface showing the teams list,
  • In this article, let us see how to identify the teams membership information with graph APIs. Let us see how to extract all teams list under a tenant using Office 365 groups data, and to extract my teams list. This data will help us drive to build an interface to list down teams and enable options to join a team if user is not a member.
  • In the next article, let us create a simple app on Power Apps to show users about the teams list, with options showing membership and join button if user is not member of the team. - http://www.techwithnakkeeran.com/2019/12/microsoft-teams-list-part-ii-building.html


Use MS Graph API to user relationship with a Team 


Let us quickly see how to find if you want to find the your team membership via Microsoft graph API.
  • Login to Microsoft graph explorer with your administrator rights. https://developer.microsoft.com/en-us/graph/graph-explorer 
  • With major version of graph API (v1.0), you will be able to identify the groups which has teams association. Note this lists down all Office 365 groups without teams filter, you will have to manually find the groups which has only teams association, using resourceProvisioningOptions parameter. https://graph.microsoft.com/v1.0/groups?$select=displayName,id,resourceProvisioningOptions 
List all Office 365 Groups without any filter - showing Group Name and team associate property

Friday, 6 December 2019

Identifying Microsoft Teams and the Classic SharePoint Team Site associations with Office 365 Groups: View on PowerApps

Let us see how to create a simple dashboard to identify if Office 365 group has been associated with Microsoft Teams and SharePoint modern team sites.

Office 365 Groups are created with various aspects. Microsoft Teams and Modern SharePoint team sites are created with/from Office 365 groups. Office 365 group is an object on Azure active directory, which will basically a collection of users.

PLEASE NOTE: Every Team created on Microsoft Teams, should have Team Site created and associated. This article only demonstrates the group and teams association, or group and sites association. The site which is not created manually/separately using group is not considered as association here, in this requirement/scenario.

To get the simple view for business users, Power Apps could be leveraged with custom connectors. There are other ways to achieve the same functionality like staging data on SharePoint with power automate and then representing the information on client apps, but I use the simple and straight forward to achieve the requirement.


Microsoft Graph API - Identify group associations


Office 365 groups data is exposed via Microsoft Graph APIs. The key parameters to be leveraged in the Graph API for this use case will be,
  • Group display Name 
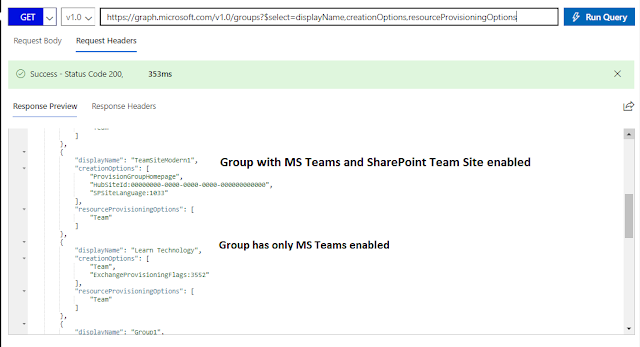
  • ResourceProvisioningOptions - if MS team is created for the group, this property will have a value “Team” 
  • CreationOptions – If modern team site has been created with the group, this property will have a value “SPSiteLanguage:1033” 

The following snapshot shows the graph API response showing if the group has Microsoft Teams and SharePoint modern team site associations.
MS Graph API - representing the associations

Saturday, 16 November 2019

Office 365 SharePoint List Data - Represented as Accordion View on Power Apps

Power Apps provides multiple ways to represent data with just out of the box configurations, without writing any code. In my specific case, there is a requirement to get accordion view of list data on Power Apps. Let us understand, how this could be achieved with elements available on Power Apps.

Let us get the data from SharePoint list, and show the accordion view. The accordion view has to be created by grouping the list items.  In our case, we will show the jobs list in the accordion view, grouped under each business/technical group. The jobs list present on SharePoint data contains title and category, where category is grouping element.

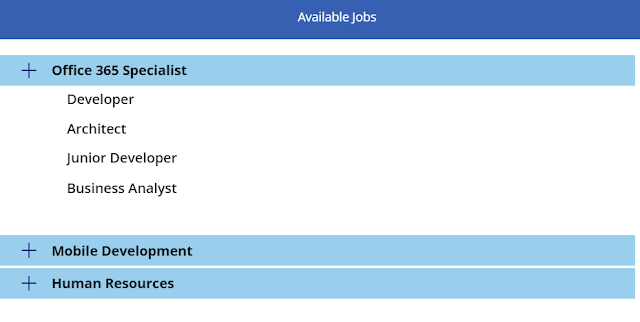
After following the steps/configurations, the final accordion view will look like the following snapshot.
SharePoint list data - Accordion view with collapsible option

Let us look at the step by step approach to configure app to get the accordion experience.

Monday, 11 November 2019

Modal Dialog Experience - Office 365 People Data on Power Apps

In my past articles, we have seen various ways to show people data. Here let us take another approach to show people/user information. Similar to modal dialog on SharePoint, we will see how to provide modal dialog like experience on Power Apps.

Let us leverage people search section from our previous articles. Build the people search as explained in my previous post.
http://www.techwithnakkeeran.com/2019/10/powerapps-app-to-show-microsoft-teams.html

On click of any user in the Power Apps user list, we will try attaching modal dialog screen. The following picture depicts the modal dialog view.
Modal Dialog View on PowerApps

Sunday, 27 October 2019

Building Organizational Chart with Office 365 data on Power Apps

Here, you will see how to build organizational chart on PowerApps.

Let us consider to have users list along with search box, to enable simple user search. On click of any user from the list, organizational chart will be shown.

Let us include following elements, to show organization structure on the PowerApps.
  1. Text box for search
  2. Gallery list for showing users
  3. Gallery list for showing manager information
  4. Gallery list for showing user reportees.

The following snapshot shows the preview of organizational chart.
Final Result: Organization Chart shown on PowerApps [Content Morphed]

Thursday, 10 October 2019

PowerApps - App to Show Microsoft Teams members using MS Graph API


Microsoft PowerApps helps business/teams in building quick OOB apps. This post helps understanding, how to get access to Microsoft Teams data from PowerApps using custom connectors.

Why there is a need for custom connector? Microsoft has introduced lot of connectors on PowerApps interface to get access to the data. The Office 365 connectors included in Microsoft PowerApps are office 365 users, mails, etc. The custom connectors are created for the data, which is not exposed as connectors readily. The custom connectors are common for both Flow and PowerApps.

We are leveraging Microsoft Graph API as data sources for this app, and to be connected as custom connectors on Microsoft PowerApps. 

The following snapshot shows the end result, showing data from MS Teams on MS PowerApps using MS Graph API.
Demo App to Show MS Teams Data

Let us look at step by step approach for achieving the functionality.

Sunday, 22 September 2019

Surveys on Microsoft Teams with notifications using Microsoft Forms and Microsoft Flow

The objective of this article is to demonstrate the power of Microsoft services available to create survey/quiz and automate processes without using any code.

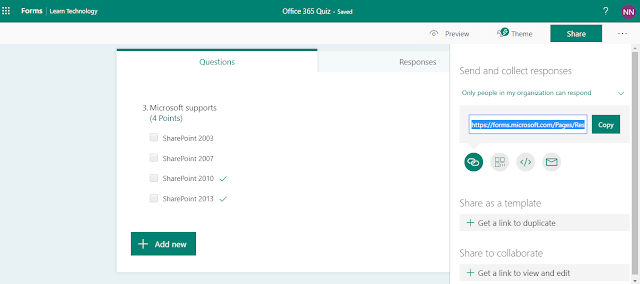
Let us first create a quiz/survey on Microsoft Form, and publish it on Microsoft Teams. Login to Microsoft Forms and create a new quiz with appropriate points. Click on Share to get the response link to the created quiz. This link is posted on Microsoft Teams to get responses (This is explained at the later point of this article).

Creating Quiz/Survey on Microsoft Forms

Tuesday, 3 September 2019

Analyse and Enable Users to Adopt to Microsoft Teams early

As we are marching towards the transition phase from Skype to Microsoft Teams, let us look how you could enable/advice users to adopt to new technology early. The article helps you understand how you could automate the process of identifying users who are not of Microsoft Teams system, and sending them reminders to adopt to the latest technology. The approach explained here is one way of identifying and enabling users to adopt to Teams sooner. There are multiple ways to enable such adoptions.


Scenario


Let us first see how technically you could identify users and notify users on the usage. For this process, we will leverage Azure Logic Apps to create automated flows to identify the user pattern (usage and reports). The usage reports will be available on the Office 365 user activity reports. To access and manipulate the user patterns, we could leverage Microsoft Graph with necessary permissions.

As an example, we will consider logged in date as a parameter for this process. We will initially analyse the Microsoft team’s usage statistics on Office 365 report center and look for user logged in activity. If there are no activity present for any user, we will trigger an automated email for earlier adoption. Let us create a flow to achieve the entire process.

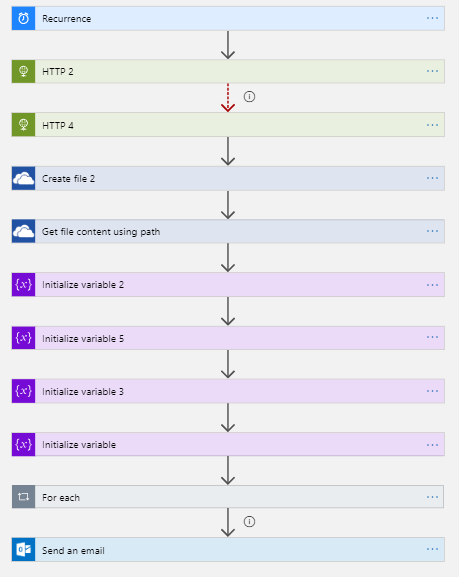
The below picture depicts the high level flow. In the below section, we will see each and every action in detail.
Azure Logic Apps Flow - To Identify Users not using Teams and Send Automated Mails

Monday, 5 August 2019

Automate Microsoft Teams Channel Creation Process with No-Code Configurations

The channels creation could be automated with the help of Microsoft Flow actions, and that is without writing any custom code. Microsoft Teams itself could be leveraged as medium for necessary user approvals.

As the Skype is sooner going to be replaced with Microsoft Teams, the necessary processes should be setup wherever required to ease the user and admin relationships.

Why do you need to setup such process? Let us consider a scenario, where your organization needs a process to create and setup channels in your Microsoft Teams tenant. Giving permissions for users/groups to create channels will end up with so much of test groups created. Instead, an approval process could be set to automate this process, to get necessary approvals for creating channels.

Configured Components


The implementation idea is going to very simple, with SharePoint and Microsoft Flow being used to automate this process. The following tools are being used for this demonstration.
  • Microsoft Teams – Medium where this logic being applied 
  • SharePoint list - an intermediate store for holding new channel registration information.
  • Microsoft Flow – Configured steps to automate, 
    • Send out necessary notifications to admins for approvals
    • Based on approval decisions, create the necessary channels under respective team
    • Send out an notification on channel creation

SharePoint/Teams Configuration


Set up the preliminary steps on SharePoint, for storing the requests.
  • Setup a SharePoint list to get input of channel details form users. The input could be team name and channel name.
  • Configure the list on any of the default teams channel tab.

The overall process is depicted in this picture.
Automate the Channel Creation Process - with no-code steps

Wednesday, 31 July 2019

Provide Anonymous User Access to Office 365 SharePoint Files for Specific Duration

In this post, let us look at giving the access to the files for specified interval. This requirement might be very useful in several aspects. Say for example, the scenario could be like the form/documents that needs to be filled within the specified deadline once generated.

Giving access doesn't mean working with file/item level permissions. This approach provides ways to generate links for SharePoint files with necessary permissions, that could be accessible for sometime.

In the previous article, we have seen ways to create and share links, which is scoped to users/groups/anonymous users.

Microsoft has recently released an update, which has new set of actions. One such feature is stop sharing an item or file action.


Provide Access for Specified Time (Stop Sharing File)


From the previous post, we will go one more step ahead in revoking the provided access and sending out notification to user on the same.

Here 3 more actions are added.
  • Delay: As per requirements, provide a delay/wait time for flow to pause.
  • Stop sharing an item or folder: Revoke all the previously shared links.
  • Send an email : Notification to say the permissions has been revoked.

Note: Stop sharing an item or folder, revokes/removes all the previously shared links, irrespective of any scope and target audience. So for example, let us consider previously two type of scoped links are created and shared for an item/folder. Executing stop sharing action will revoke/remove all the share links for that particular item/folder.

Saturday, 20 July 2019

Create and Share Scoped Links of SharePoint Files to Users using Microsoft Flow

Assume a file is getting generated/getting created by users on the SharePoint online platforms. The business wants to share the file links with the targeted groups/users, which is view-able or editable. This business process is automated using SharePoint’s in-built sharing feature and Microsoft Flow.

SharePoint online has an inbuilt share feature, for creating links for items/files on it’s platform (At the end of this article, this OOB share feature snapshot is shown for reference). The scope of this feature is available in the following levels.
  • Anonymous
  • Organization
  • Specific people

Microsoft Flow has a SharePoint action called “create sharing link feature for a file or folder”. At the time of writing, this action has the following scopes only.
  • Anonymous
  • Organization
Note: 
  • The type of access could be either 
    • view and edit
    • or, view
  • There is no scope for sharing it to specific people.

Wednesday, 26 June 2019

Capture and Document User Information with Image on SharePoint - Part II


This is second part of article on capturing and documenting user details on to Office 365 SharePoint. The previous article shows setting up the Microsoft Flow to capture and creation of document with user details.
In this article, recording of user details is discussed. PowerApps forms are used to capture the user details. The details includes user name, picture, etc. Then integrating the form with Microsoft Flow is discussed.


Setting up the User Form

In my scenario, there are only two user entries recorded.
  • User Name
  • User Picture
Let us set the form.
  • Navigate to PowerApps portal/ app, and then select blank app.
  • From insert option, select two screens-
    • New blank screen - For user input
    • New Success screen - For showing user success message.
Screens & Controls Configured on the Form

Tuesday, 18 June 2019

Capture and Document User Information with Image on SharePoint - Part I


In this article, let us see how user details including user picture could be captured and saved onto SharePoint as documents using PowerApps and Microsoft Flow.

Here is the detailed scenario: User details like Name, picture, etc. needs to be captured and documented, and has to be made available on SharePoint. This process could be automated with the help of Office 365 SharePoint, PowerApps and Microsoft Flow.

The following points depicts this automated flow.
  • Using PowerApps, Custom Form needs to be created showing the required fields.
  • Microsoft Flow will be used to capture the information entered into the Form.
  • The flow once captures the information, it will format the data and creates the document, before saving it to SharePoint. 
    • Creation of documents is not straight forward approach. So in this case HTML file needs to be created. [The proper formatting could be done by taking HTML file creation approach.] 
    • Then HTML file is converted into required format. Then the target document could be uploaded into SharePoint library.
Note: One Drive for Business connectors provides necessary actions for creation and conversion of documents. The same will be leveraged in this samples.

Saturday, 25 May 2019

Accessing SharePoint Data with SPFx User Tokens via Service Layers - Part II

We are looking at getting user tokens retrieved from SPFx solutions, and leveraging the tokens on Azure service layers to access the SharePoint data on behalf of user.

So far, we have seen [link]
  • Creating SPFx solution by mapping necessary permissions to the package-solution.json file. 
  • Tuning the code, to get the access code for Microsoft Graph resources.

Here, by end of this reading, you will get to know how to use the token on Azure service to get access to SharePoint data.


Deploy & Approve Permissions:


Open the created SPFx solution and deploy the solution, before even testing the code on workbench. As the component requires permissions for accessing the data on SharePoint, the permissions requested should be approved before accessing. Once the component is deployed, the required permissions will be listed for approval under admin portal’s API management section.

In my case, the admin portal URL for approving necessary permissions will be
https://nakkeerann-admin.sharepoint.com/_layouts/15/online/AdminHome.aspx#/webApiPermissionManagement

Tuesday, 21 May 2019

Accessing SharePoint Data with SPFx User Tokens via Service Layers - Part I

Let us have a detailed look at using the SharePoint SPFx user tokens, outside the SharePoint environments.

Why is it necessary to use the user tokens? To get to access the SharePoint data from third party services with user context. The scenario is explained below.

Usecase/Scenario: 

SPFx component accessing the SharePoint data via service layers with same user context : Weird scenario? Yes, it is very much needed in some cases like chat bot implementations or in other business processes. Say, You are working on the SharePoint component, and you need to pull data from SharePoint, but via other service like Azure services (See, we are not accessing SharePoint data directly from SharePoint component). In this case, your Azure service needs to authenticate with the SharePoint tenant, on behalf of you. That could be done by passing the oAuth tokens from SPFx to Azure service.

The flow will be as follows.
  • Create SPFx solution and map the necessary permissions on the package file.
  • Develop SPFx code, that communicates with AAD token provider and acquires the user token.
  • Pass the token to service layers like Azure Services. [This is not explained in this post. Based on the requirements, the service layer call could change. For example, if it is endpoint accessible using the endpoint, the normal REST call could be sufficient to get it working]
  • Azure service accesses the SharePoint data using the token available.
  • Azure service responds back to SPFx component with relevant data. [This is not explained in this post]

Tuesday, 7 May 2019

Power BI Reports with Map Visualizations For Office 365 SharePoint List Data

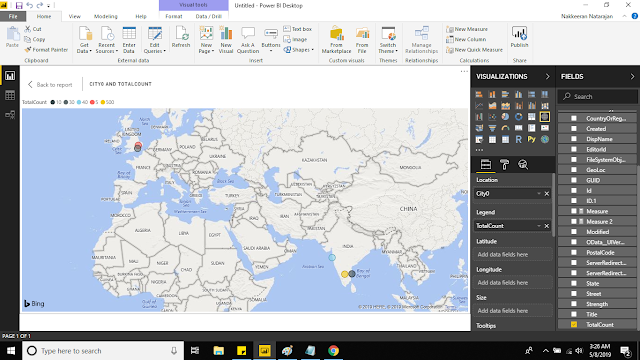
Let us look how to integrate and show the Office 365 SharePoint data on to Power BI reports. In this specific use case, we will look how to SharePoint data as map views.

Consider a very basic scenario of showing organization location-wise user count on Power BI dashboards. So in this case, the organization data is available as SharePoint list, and consider only two parameters, that is location and user count.

The below snapshot shows the data loaded onto Power BI. Let us see step by step approach below.
PowerBI showing the SharePoint List Data as Locations on Map Visuaization
PowerBI Report showing the SharePoint List Data as Locations on Map Visualization

Thursday, 11 April 2019

Restrict Permissions on Editing SharePoint SPFx Property Pane Configurations

Let us look, how the SPFx web part property configurations changes can be controlled by user permissions.

Let us assume a scenario, where administrators can only change the SPFx web part property values.

The following steps helps achieving the requirement.
  • The permissions of logged in user details could be identified using the context/page context.
  • While rendering the property pane configurations, the current user permissions could be checked.
  • So the properties could be enabled based on the permissions, i.e., properties will be editable, if user has admin access to the site.

This could be achieved, using the WebpartContext property and SPPermission class.

The object is initialized, using the current user permission details, and then site permission is checked for user.
    let permission = new SPPermission(this.context.pageContext.web.permissions.value);
    let isAdmin = permission.hasPermission(SPPermission.manageWeb);

Sunday, 7 April 2019

Using MS Graph API and Adaptive Cards for Search/Render User Details with SPFx solutions

In this article, we will learn how to develop SPFx webparts for Office 365 SharePoint site and Microsoft Team, that leverages Microsoft Graph to search users and adaptive cards for rendering the user data effectively.

The sample used here uses the adaptive card, which has a very minimal UI. The sample used, shows how effectively UI could be changed by users. But complex custom UI could be built using the adaptive cards.

Adaptive Cards:

Let us use the adaptive card on our SPFx component for displaying user details. The following provides you the basic understanding.
  • Introduced recently, a new way for developers to render content in a consistent way, which is a open framework. 
  • It is providing options for developers, to design the UI for the specific component, using schema or visually.
  • https://adaptivecards.io/designer
  • Primarily targeted for BOT frameworks, Teams, Cortona, and windows notifications.
The following snapshot showing the UI built for our sample. This snapshot has 2 container sets for displaying 2 user details. In the schema mentioned later in the article, the single container is used, which could iterated using for loops for building containers for the required user set.

Adaptive Card Visual Interface for building component with UI

Monday, 1 April 2019

Using Azure Devops & Github to Automate SPFx solution Packaging Processes for MS Teams and SharePoint

In this article, we will understand how SPFx solutions built for MS Teams and SharePoint portals, could be automatically packaged and uploaded into app catalog portals. This automation is achieved with the help of Azure Devops and Github version control systems. Using devops ensures us the continuous delivery of changes onto the target platforms.
  
Remember, we will be targeting the webparts of this solution for SharePoint and as tabs for Microsoft Teams. Let us use github repositories as a version control tool for storing the solution. You will understand, how github could be easily integrated with Azure Devops for automating the packaging processes in this article. 

Create the SPFx solution, that is compatible for SharePoint online portals. The SPFx solution (available on the github https://github.com/nakkeerann/globalspfxsoln) contains, the azure-pipeline configuration file template for setting up the build pipelines. The following snapshot shows the configurations for creating SPFx solution. 

Push the code into Github using the git commands. For example, below commands are used for my repository.
git initgit add .git commit -m "first commit"git remote add origin https://github.com/nakkeerann/globalspfxsoln.gitgit push -f origin master


Install the Azure Pipelines to your Github account https://github.com/marketplace/azure-pipelines . Select the repositories required to install pipelines. Authorize azure pipelines. 

Friday, 15 March 2019

Office365 SharePoint: Validate & Transform XML Data from Enterprise Systems into SharePoint using Azure Logics App

In this article, you will understand how the XML content from enterprise systems is first validated and converted/transformed to JSON, and pushed to Office 365 SharePoint online lists. We will be leveraging the power of Azure services, to achieve everything with just configurations.

The services used under Azure will be
  • Logics App
    • The entire flow will be set here. 
  • Integration account.
    • With in integration account, we will store the schema and map files to validate and transform the data.

In my previous article, you have seen how the JSON content from enterprise systems is flowing into SharePoint online. There, we have not focused on validating the JSON data, since HTTP trigger by default validates.

We have seen the introduction to the features being leveraged in the previous article. Let us get directly into the business scenarios.


Business Scenario


Assume an enterprise system exposes XML data to multiple systems. We will consider source system to be HTTP service (for our POC) and the target system to be SharePoint. The XML data from source system cannot be directly feed into SharePoint. For this purpose, we need to transform the XML content, into the required format. The following picture depicts the transformation. The data being transformed is a SharePoint list item entry, along with metadata properties required for the list item.
Data Representation between two systems. Left - XML data from HTTP service, and Right - JSON data compatible for SharePoint
Data Representation between two systems. Left - XML data from HTTP service, and Right - JSON data compatible for SharePoint list

Wednesday, 27 February 2019

Office365 SharePoint : Converting Enterprise System Data using Azure Integration Account Map Component and Logic Apps

This article explains the advantages of using Azure Integration account along with Azure Logics App for integrating enterprise systems with Office 365 SharePoint.  


Azure Integration Account & Logic Apps:


Azure Integration account provides ways to store and manage the components/artifacts, that includes agreements, maps, schemas, etc. In this article, let us look at leveraging maps component and also look at advantages of using it.  

Maps component is used for mapping the data from one system into another system. The mapping of two systems, those using different form of data. These scenarios are handled by using liquid template mapping or XSLT mapping formats. Here in this article, liquid templates are used for mapping the data. 

Azure Logic apps is leveraged to explain the enterprise integrations scenarios, along with usage of Azure Integration account’s map. In the scenarios explained below, I have shown the data flow between HTTP service and SharePoint for easy understanding. 


Business Scenario & Mapping:


We are considering two services. One HTTP services that uses JSON for representing the data, and other SharePoint REST API that again uses JSON to represent the data. But there is variation in format that is being used between these two services. Say for example, we are using services to move the book details from one HTTP post request to SharePoint. The following picture depicts the data transformation. 
Data Representations between two services/systems
Data Representations between two services/systems considered
Note: Assume HTTP service as another system, which posts data. For our easy/better understanding, i have simplified the logic with simple data representations.

Saturday, 9 February 2019

Analyze Office 365 SharePoint online Data using Azure Data Lake Storage and Analytics Service – Part II

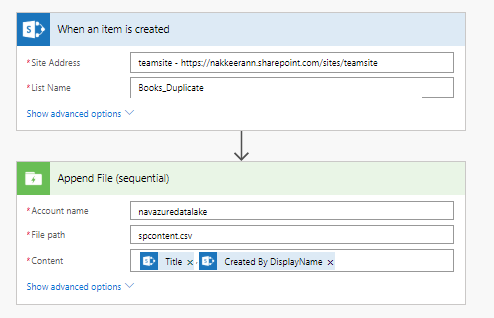
In this article, we will understand how Microsoft flow can be configured to push the data from Office 365 SharePoint list into Azure Data Lake Storage service. We could also understand, how the data can be analyzed using the Azure Data Lake Analytics service.

In the previous article, you could understand the benefits of using Azure Data Lake Storage & Analytic services. Also, it helps configuring these two Azure services.


Setting up Microsoft Flow 


  • Login to the Microsoft Flow Portal. Go to my flows, and select create flow from blank option. The following snapshot shows the flow being configured.
MS Flow steps to push Data From SharePoint to Azure Data Lake Storage

Friday, 1 February 2019

Analyze Office 365 SharePoint online Data using Azure Data Lake Storage and Analytics Service – Part I

This article series helps you understand pushing the data from SharePoint online into the Azure Data Lake Storage, then making data available for analytics services. We could get to know the benefits of using Azure Data Lake storage and Data Lake analytics service.


The following steps are created and configured for the flow.
  • Create Azure Data Lake Storage 
  • Create Azure Data Lake Analytics 
  • Configure Microsoft Flow to push data into Azure Data Lake Storage 
  • Configure Azure Data Lake Analytics service to process the storage data. 

Note: There might be plenty ways to integrate the data into the Azure Data Lake storage. But here, let us leverage Microsoft flow for easily pushing data from one system to another. It is just a two step process.


Why Azure Data Lake Storage & Analytics? 


Before building the solution, let us know the benefits of using these services. Azure Data Lake storage is primarily used for processing big data analytics. The services/solution works around big data, can be easily integrated with the Azure Data Lake storage service. This will be optimized storage for big data work analytics workloads. The data stored into the Azure data lake store, are in the form of hierarchical file system.

Wednesday, 23 January 2019

Adding Tasks to Office 365 Project Online Plan Schedules Using Microsoft Flow - Automate Project Management Process

Here let us look how to automate the addition of tasks into Project online using Microsoft Flow. Let us trigger this automation, on mail arrival. This article helps in automating project management processes.

As you are aware, MS flow helps connecting systems, with only condition that the services should be exposed. In this article, I have leveraged the inbuilt triggers and actions to achieve our requirement. This flow creates tasks on Office 365 project web app online plans, when an email arrives on to Office 365 outlook mailbox.


Scenario & Flow


Trigger can be from anything. Here for our basic understanding, I have thought of leveraging mailbox. So let us look at the flow.
  • Trigger - In this use case, I have considered email trigger. i.e., mail arrives with specific subject. The subject contains the task detail. 
  • Flow will be triggered, on arrival of any mail to the mailbox mentioned. 
  • Flow checks few conditions. i.e., mail subject contains text for addition of task to project. 
  • If condition is satisfied, then process the following. 
    • Checkout project 
    • Add task with task name. (Task name will be extracted from the subject of email) 
    • Publish & Check-in the project. 

Sunday, 20 January 2019

CSOM: Working with Office365 Project Online Tasks - Part II

This article explains steps for adding, updating or deleting a task to/from Office 365 Project Online plan schedules.

This article series focuses on working with  office 365 project online plan schedule tasks using Client Side Object model approach. In the previous post, we have seen multiple ways of retrieving tasks from the project plans.


Adding a Task: 


A task can be added to the Office 365 project plan schedule by the following steps.
  • Required project needs to be checked-out before any operation. 
  • Task collection is retrieved from the draft project. 
  • Task creation object is created with necessary OOB field values, and will be added to the task collection. 
  • Then the draft project will be updated and published. 

Friday, 11 January 2019

CSOM: Working with Office365 Project Online Tasks - Part I

This article series focuses on working with office 365 project online plan schedule tasks using Client Side Object model approach.

Previously we have seen how the same operations works using JSOM approach. Both approaches are identical.


Creating Console App and Importing Package: 


SharePoint and Project Server online libraries are required to work with the project server data using CSOM model. The libraries can be downloaded from Nuget packages. The required libraries are packaged under one single package. i.e., Microsoft.SharePointOnline.CSOM

Create a visual studio console application. From Tools -> Nuget Package Manager -> Manage Nuget Packages for Solution. From the browse tab, Find for “Microsoft.SharePointOnline.CSOM”. Select and install the package for the current solution.