Showing posts with label msflow. Show all posts

Sunday 22 September 2019

Surveys on Microsoft Teams with notifications using Microsoft Forms and Microsoft Flow

The objective of this article is to demonstrate the power of Microsoft services available to create survey/quiz and automate processes without using any code.

Let us first create a quiz/survey on Microsoft Form, and publish it on Microsoft Teams. Login to Microsoft Forms and create a new quiz with appropriate points. Click on Share to get the response link to the created quiz. This link is posted on Microsoft Teams to get responses (This is explained at the later point of this article).
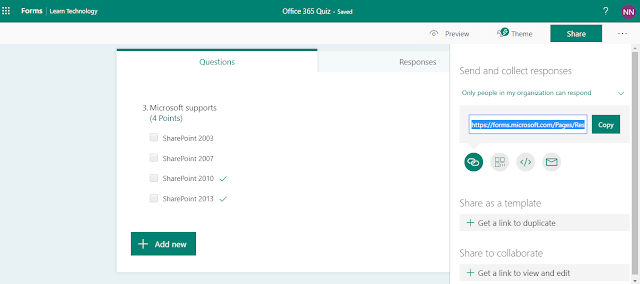
Creating Quiz/Survey on Microsoft Forms

Tuesday 3 September 2019

Analyse and Enable Users to Adopt to Microsoft Teams early

As we are marching towards the transition phase from Skype to Microsoft Teams, let us look how you could enable/advice users to adopt to new technology early. The article helps you understand how you could automate the process of identifying users who are not of Microsoft Teams system, and sending them reminders to adopt to the latest technology. The approach explained here is one way of identifying and enabling users to adopt to Teams sooner. There are multiple ways to enable such adoptions.


Scenario


Let us first see how technically you could identify users and notify users on the usage. For this process, we will leverage Azure Logic Apps to create automated flows to identify the user pattern (usage and reports). The usage reports will be available on the Office 365 user activity reports. To access and manipulate the user patterns, we could leverage Microsoft Graph with necessary permissions.

As an example, we will consider logged in date as a parameter for this process. We will initially analyse the Microsoft team’s usage statistics on Office 365 report center and look for user logged in activity. If there are no activity present for any user, we will trigger an automated email for earlier adoption. Let us create a flow to achieve the entire process.

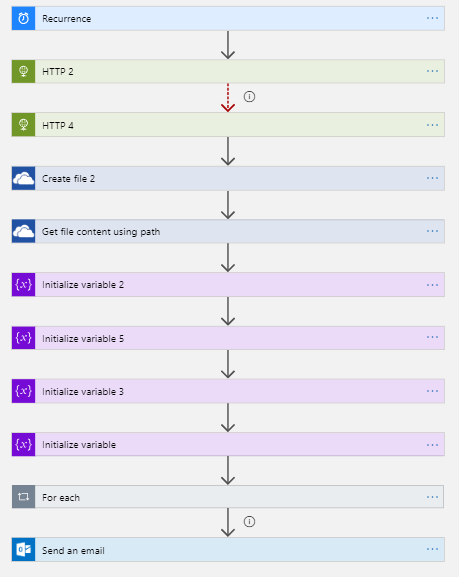
The below picture depicts the high level flow. In the below section, we will see each and every action in detail.
Azure Logic Apps Flow - To Identify Users not using Teams and Send Automated Mails

Wednesday 26 June 2019

Capture and Document User Information with Image on SharePoint - Part II


This is second part of article on capturing and documenting user details on to Office 365 SharePoint. The previous article shows setting up the Microsoft Flow to capture and creation of document with user details.
In this article, recording of user details is discussed. PowerApps forms are used to capture the user details. The details includes user name, picture, etc. Then integrating the form with Microsoft Flow is discussed.


Setting up the User Form

In my scenario, there are only two user entries recorded.
  • User Name
  • User Picture
Let us set the form.
  • Navigate to PowerApps portal/ app, and then select blank app.
  • From insert option, select two screens-
    • New blank screen - For user input
    • New Success screen - For showing user success message.
Screens & Controls Configured on the Form

Saturday 9 February 2019

Analyze Office 365 SharePoint online Data using Azure Data Lake Storage and Analytics Service – Part II

In this article, we will understand how Microsoft flow can be configured to push the data from Office 365 SharePoint list into Azure Data Lake Storage service. We could also understand, how the data can be analyzed using the Azure Data Lake Analytics service.

In the previous article, you could understand the benefits of using Azure Data Lake Storage & Analytic services. Also, it helps configuring these two Azure services.


Setting up Microsoft Flow 


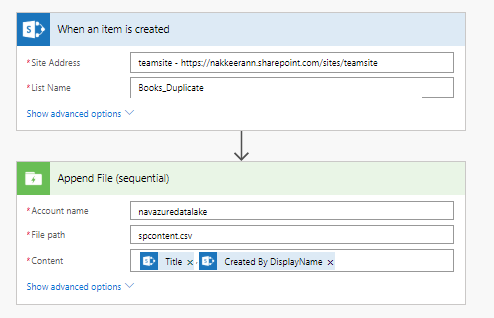
  • Login to the Microsoft Flow Portal. Go to my flows, and select create flow from blank option. The following snapshot shows the flow being configured.
MS Flow steps to push Data From SharePoint to Azure Data Lake Storage

Friday 1 February 2019

Analyze Office 365 SharePoint online Data using Azure Data Lake Storage and Analytics Service – Part I

This article series helps you understand pushing the data from SharePoint online into the Azure Data Lake Storage, then making data available for analytics services. We could get to know the benefits of using Azure Data Lake storage and Data Lake analytics service.


The following steps are created and configured for the flow.
  • Create Azure Data Lake Storage 
  • Create Azure Data Lake Analytics 
  • Configure Microsoft Flow to push data into Azure Data Lake Storage 
  • Configure Azure Data Lake Analytics service to process the storage data. 

Note: There might be plenty ways to integrate the data into the Azure Data Lake storage. But here, let us leverage Microsoft flow for easily pushing data from one system to another. It is just a two step process.


Why Azure Data Lake Storage & Analytics? 


Before building the solution, let us know the benefits of using these services. Azure Data Lake storage is primarily used for processing big data analytics. The services/solution works around big data, can be easily integrated with the Azure Data Lake storage service. This will be optimized storage for big data work analytics workloads. The data stored into the Azure data lake store, are in the form of hierarchical file system.

Thursday 11 October 2018

Using Azure Functions, Cognitive Services and Flow for classifying Office 365 SharePoint Word Documents - Part II

Let us look how to integrate Azure Function, Cognitive services into Microsoft Flow for extracting tags/categories and update the SharePoint document item.

This article series helps us to work on a special use case of extracting information of word documents uploaded to Office 365 SharePoint libraries and then analyze/classify the document content using Azure Cognitive Services. Then update the document with classified data as tags/categories. The article links are shown below.


Extract Code From Github


The Azure function created in the previous article is available on Github repository (https://github.com/nakkeerann/analyze-sp-word-documents).
  • Clone the code from the github repository to the local. 
  • Open in visual studio and make necessary changes, like updating user credentials and SharePoint site and details.

Saturday 6 October 2018

Using Azure Functions, Cognitive Services and Flow for classifying Office 365 SharePoint Word Documents - Part I

This article series helps us to work on a special use case of extracting information of word documents uploaded to Office 365 SharePoint libraries and then analyze the document content using Azure Cognitive Services.

We have seen before extracting tags and metadata properties of image files from Office 365 SharePoint using Microsoft Flow and Azure Cognitive Services.

Microsoft Flow has a Get File content action, but that doesn't help extracting word documents content. Only it supports extracting content of notepad as straight forward approach. Since Microsoft Flow doesnt provide any option to read the word documents content, we will be using Azure Functions to extract the content. Once we have the content, we will use Azure Cognitive service to get the tags for the content extracted. Here Microsoft Flow is used to manipulate triggers and subsequent actions. So our algorithm is will be as follows.

High level architecture for classifying SharePoint Word Documents

Saturday 22 September 2018

Connecting Office 365 SharePoint with CDS using Microsoft Flow

How many of you have heard about CDM and CDS? These two components are availabe on Microsoft platform. CDM stands for Common Data Model and CDS is Common Data Service.

CDM is a secured database stored on Microsoft Azure, which contains business standard entities. Those entities can be used by users for various purposes including integrations. This is commonly used for integrating two Microsoft Systems, with the help of templates/entities.

CDS is a basically a service, that utilizes common data model to enable cross platform reporting capabilities. It is most commonly used on Power BIs for report generations.


Scenario

Think of a scenario, where some application uses common data service for storing the data. And some application uses Office 365 SharePoint as the storage point. And both of these applications deals with the same data sets. In this case, both of these storage system needs to be synchronized.

The solution which we are looking at may not be a full end to end solution, but let’s see how we can push data from SharePoint to CDS. There might be many ways, but here let’s look how it can be done easily using Microsoft Flow with just configurations.

Wednesday 12 September 2018

Error Handling for Office 365 SharePoint Actions on Microsoft Flow

In this post, let us look how we are going to handle the Office 365 SharePoint action errors that occurs on Microsoft Flow platform.

Problem Statement: There is an option to get the user profile property on Microsoft Flow using SharePoint REST API. We need to handle if there is any error to this action. Let us see how to handle/catch the error and send a mail with error details.

Sometime back I have published an article for updating user display names for items created on SharePoint using Microsoft Flow. We will use the same concept here, but only we will see how to catch and send the error details over mail.

The flow to get and update the user profile property is as follows.
  • Create a trigger to fire the flow whenever an item is created.
  • Create a SharePoint action “Send an HTTP request to SharePoint”, to get the user profile property details as explained in the article mentioned above.
  • Parse JSON data to get the exact required property (user display name).
  • Update the same item with author name field with the value retrieved.


Handling Error:


The following steps shows how to configure the flow to handle the error and configuring appropriate send email action.
  • Just after the “Send an HTTP request to SharePoint” action, add a parallel branch with an action. 

Friday 7 September 2018

SharePoint Saturday Bangalore Event - Automating SharePoint Processes with Microsoft Flow

SharePoint Saturday Bangalore 2018 is a free and open SharePoint community event to exchange the knowledge and build fellowship.

Developer Track Session at a SharePoint Saturday Bangalore 2018 Event - Automating SharePoint Processes with Microsoft Flow! It was an extended interactive session where the benefits of using MS Flow for SharePoint explained with live demos.

I spoke on Automating SharePoint Processes with Microsoft Flow in a short session. The session was a developer track session, which had lot of tips, and demos. The agenda included,
  • Introduction to Flow
  • Templates and Connectors Available
  • How to create custom connectors
  • How to create and integrate flows with SharePoint or other systems
  • Data Loss Prevention Policies
  • Benefits & Conclusion

Microsoft Flow is a cloud based tool that helps building automated workflows between multiple systems. In the session, I will be explaining the basic understanding on MS FLOW. Further, I will focus more creating the custom connectors, and let us also look at creating flows with the help of custom connectors.

https://www.slideshare.net/NakkeeranNatarajan/automating-sharepoint-processes-with-microsoft-flow-spsbangalore

Tuesday 24 July 2018

Protecting Office 365 SharePoint Data on Microsoft Flow

Here, let us look how we can protect the Office 365 SharePoint application data on Microsoft Flow.

Microsoft Flow is used for connecting multiple services and applications. The data flows between multiple platforms, with the help of Microsoft Flow.

Imagine there are business critical data available on SharePoint and your organization doesn’t let data to move out of its controlled systems. As administrator, you can build environments and restrict the data flow with the help of Data Loss Prevention (DLP) policies.

DLP policies are created to restrict the data flow between business connectors and non-business connectors. The restrictions are made with help of data groups. The Data groups are of two types, Business data only and No business data allowed. The connectors can be added to these two data groups.

If you don’t want data to be available on social media platforms like Facebook or twitter, you can keep the social media connectors on “No business data allowed” group. The restriction cannot be made just for social media connectors; it can be applicable to any connector, if the connector is not listed under “Business data only” data group.

Friday 6 July 2018

Analyze and Classify Images on Office 365 SharePoint using MS Flow and Azure Service

Let us see how the Office 365 SharePoint library images are analyzed using Microsoft Flow and Azure Cognitive Service. By analyzing the images, we can classify the images. Also, we can extract the image description, tags or taxonomy data of image, locations present on images, or even the image categories.

Azure Cognitive service provides Computer Vision API, which helps providing tools to understand the content of any images. Computer vision API helps in classifying the image, identifying captions of image and even image categorizations. Further API helps in recognizing celebrities and landmarks, reading out text from images, analyzing video in real time and generating thumbnails for the videos.

Computer vision API can be leveraged on multiple platforms. Microsoft Flow is one such powerful platform, where we integrate computer vision API for analyzing the images uploaded to SharePoint.

Use Case: Let us see how the images uploaded can be analyzed classified on SharePoint images library. At the end of article, you will know how the below image uploaded can be updated classification and description data.

Monday 25 June 2018

Making Office 365 SharePoint REST API calls on Microsoft Flow

In this post, let us look how we can work with the SharePoint data using the REST APIs explicitly in the Microsoft Flow. We will be using this approach when no action/connector are available OOB for processing the required SharePoint data on the MS Flow. Person who have knowledge on the APIs used will prefer to use this approach.

In my previous post, we have built the connectors/actions using the REST APIs. The objective of my previous post, was to show how any connector/action can be created and published on the portal. Such actions can be shared with other users and it is readily available as OOB actions for other/end users. Connectors/Actions will be created by developers and the business users will use such connectors on their flows.

At the end, both the approaches yield the same results. Both the approaches will be used only when no connector is available for users to work with the required data. Hope the above explanation differentiates two approaches available for working with the SharePoint data.

Let us look how we can retrieve the required SharePoint data using the REST APIs available. We can use the OOB action “Send an HTTP request to SharePoint”. This action supports any type (GET, PUT, POST, PATCH or DELETE) of service calls. In the sample below, let us only look at the GET operation.

Use Case: Retrieve the use profile properties of item author, whenever an item created on SharePoint list.

Friday 1 June 2018

Configure Microsoft Flow for Sending Office365 SharePoint File Attachments in the Mails


Here, let us look how to configure Microsoft Flow for sending mails with Office 365 SharePoint library files as attachments.

Imagine there is a requirement of sending mails with SharePoint library files as attachments, if a file/item is created/uploaded. Previously we were creating tools for such requirements. Unfortunately, SharePoint designer doesn’t provide option for attaching files in the mails, in the configurations.

Microsoft Flow provides a solution for the above requirement. The solution just includes few configuration steps, which might take one or two minutes of your effort J

Use Case: Whenever a file is created in the folder, send out a mail notification with the uploaded file as attachment to a particular mail box.


Steps Involved:


The following steps shows the detailed configuration steps.
  • Create a Microsoft Flow with a blank template as base.
  • Select SharePoint connector, search and select “When a file is created in a folder” trigger. In the trigger, Provide the site address URL and select the necessary library/folder path.

Wednesday 23 May 2018

Creating Office 365 SharePoint Custom Connectors on Microsoft Flow

Here, let us look how the custom connectors can be created for accessing SharePoint data on Microsoft Flow.

Microsoft Flow provides multiple connectors from various services including SharePoint to work with the data. The connectors contain multiple triggers and actions. For SharePoint connector by Out of the Box, Microsoft provides 8 triggers and 28 actions on Microsoft flow.

UseCase: Imagine you want to retrieve the SharePoint user profile data of some user. Currently there is no action available for MS Flow developers to retrieve SharePoint user profile data. Such triggers and actions can be created by developers on the Microsoft Flow platform. In this post, let us look how one such custom action can be created and used on the Microsoft Flow platform.

The configuration involves the following steps.
  1. Configuring Azure AD Application, which provides necessary permissions and helps in authenticating the calls made from Microsoft Flow.
  2. Generating the collection file (Swagger) using postman tool, which will be used as base file while building the custom connector.
  3. Configuring the custom connector, which will make call to SharePoint to get the required data with necessary inputs.
  4. Testing the custom connector created above.
  5. Creating/Configuring the flow, which will also use the custom connector we have created above.


Configure Azure AD Application for Flow Authentications:


  • Create a new app on the Azure Active directory.

Tuesday 14 November 2017

Using Webhooks for Posting SharePoint Items into MS Teams with Flows

In my previous post, you would have seen posting the items into Microsoft Teams Channels as conversations using Microsoft Flows. The respective channels will be chosen by selecting the Teams service in the flow configurations.

In this post, let us try to achieve similar kind of functionality, but with a little different approach. As we are all aware that Microsoft Teams will support incoming webhook requests, let us try configuring the webhook URLs.


Webhook:


What is webhook? The external system which posts messages whenever data is available using the endpoint APIs.


How the webhook will help in Microsoft Teams? Take for an example, you are using Teams as a collaboration platform. You need to post data from multiple systems to the team channels for better collaboration. The webhook URL can be generated for a channel and can be shared with other external systems. Whenever the external system has the data for posting, the data will be sent to the teams using the API generated.


Saturday 28 October 2017

Post SharePoint Items into MS Teams using MS Flows

Posting SharePoint Items as Conversations in Microsoft Teams


Here let us see how to push the items from SharePoint into the Microsoft Teams Channels as conversations using Microsoft Flows. #MicrosoftTeams #MicrosoftFlow

This is simple, straight forward and out of the box approach. Microsoft Flow eases our job with out of the box configuration.

Consider a business scenario, whenever an item is created in the SharePoint repository, it has to be pushed into Microsoft Team’s channel for discussions. The following steps will helps you in configuring the flow out of the box.

Note: Assuming, the connections for teams and SharePoint services are being available in the Microsoft Flow portal. If not already created, you will be prompted to provide the account details when configuring the SharePoint or the Microsoft Teams components in the below steps. You can provide different or the same account details. The accounts to the SharePoint or Microsoft teams can also be configured on the Microsoft Flows portal by navigating to the connections component.

Steps Involved:

  • Create a list in the SharePoint site.
  • Create a channel in the Microsoft teams.
  • Login to the Microsoft flows.
    • Select the SharePoint service à "when an item is created" template.
    • Provide the site details and list details.
    • Click on New Step à Add an action option.
    • Search for Microsoft teams and select it.
    • Select Post Message option.
    • From the drop down select the Microsoft Teams ID, Channel ID, and Message to be posted.
    • Here, message to be posted can be customized. Click on the message text box and select the SharePoint item field by adding dynamic content. (picture shown below)
  • Save the flow.


Test the Flow:

  • Login to the SharePoint site and navigate to the list.
  • Create an Item à Provide some data and save it.
  • Login to the Microsoft Teams and navigate to the channel provided in the configuration.
  • You can see the item created in the SharePoint list, posted as a conversation in the Team’s channel.