This article series helps you understand pushing the data from SharePoint online into the Azure Data Lake Storage, then making data available for analytics services. We could get to know the benefits of using Azure Data Lake storage and Data Lake analytics service.
The following steps are created and configured for the flow.
Note: There might be plenty ways to integrate the data into the Azure Data Lake storage. But here, let us leverage Microsoft flow for easily pushing data from one system to another. It is just a two step process.
Before building the solution, let us know the benefits of using these services. Azure Data Lake storage is primarily used for processing big data analytics. The services/solution works around big data, can be easily integrated with the Azure Data Lake storage service. This will be optimized storage for big data work analytics workloads. The data stored into the Azure data lake store, are in the form of hierarchical file system.
But it depends upon the requirement on choosing the services. If you only focus on primarily storage service, then the Azure Blog storage should be the preferred choice.
Azure Data Lake Analytics service helps in processing the data being stored on the storage service. It has in-built features for connecting to the storage service. The key features of using this service could be less complexities in processing the big data on cloud, injecting U-SQL scripts for processing your jobs, ability to analyze the huge data, etc.
There are multiple ways of integrating SharePoint with the storage service. By leveraging Microsoft Flow, this could be achieved in just two step process, and could be accomplished within minutes (The detailed steps available in the next article). The other ways of integrating SharePoint data into Azure Data Lake storage could be, building pipelines using Azure Data Factory, Azure functions utility for connecting two systems, etc.
First let us create the Azure Data Lake storage service on the Azure portal. Click create a resource option, and then search for Azure Data Lake Storage. Provide the necessary details, and create the service.
The following snapshot shows the azure data lake storage service created.

Then create the analytics service. Click create a resource option, and search for data lake analytics service. Provide the necessary details and create the analytics service.
The following snapshot shows the data lake analytics service being created.

In the next article, we will see the flow, and how data could be processed. Also, let us work on creating a sample U-SQL script for processing the data lake storage files using data lake analytic service.
The following steps are created and configured for the flow.
- Create Azure Data Lake Storage
- Create Azure Data Lake Analytics
- Configure Microsoft Flow to push data into Azure Data Lake Storage
- Configure Azure Data Lake Analytics service to process the storage data.
Note: There might be plenty ways to integrate the data into the Azure Data Lake storage. But here, let us leverage Microsoft flow for easily pushing data from one system to another. It is just a two step process.
Why Azure Data Lake Storage & Analytics?
Before building the solution, let us know the benefits of using these services. Azure Data Lake storage is primarily used for processing big data analytics. The services/solution works around big data, can be easily integrated with the Azure Data Lake storage service. This will be optimized storage for big data work analytics workloads. The data stored into the Azure data lake store, are in the form of hierarchical file system.
But it depends upon the requirement on choosing the services. If you only focus on primarily storage service, then the Azure Blog storage should be the preferred choice.
Azure Data Lake Analytics service helps in processing the data being stored on the storage service. It has in-built features for connecting to the storage service. The key features of using this service could be less complexities in processing the big data on cloud, injecting U-SQL scripts for processing your jobs, ability to analyze the huge data, etc.
How the Office 365 SharePoint data can be connected to the Azure Data Lake Storage
There are multiple ways of integrating SharePoint with the storage service. By leveraging Microsoft Flow, this could be achieved in just two step process, and could be accomplished within minutes (The detailed steps available in the next article). The other ways of integrating SharePoint data into Azure Data Lake storage could be, building pipelines using Azure Data Factory, Azure functions utility for connecting two systems, etc.
Creating Azure Data Lake Storage
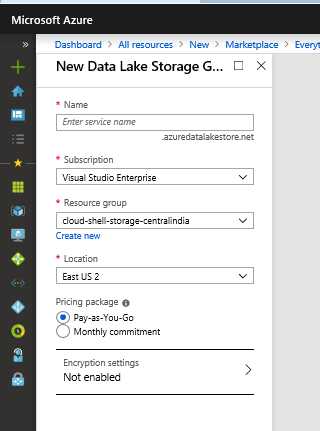
First let us create the Azure Data Lake storage service on the Azure portal. Click create a resource option, and then search for Azure Data Lake Storage. Provide the necessary details, and create the service.
- Service Name
- Subscription
- Resource group
- Location
- Pricing Package – Click on the information icon to know more about the pricing packages available. I prefer going with pay-as-you-go option, since we are working on POC.
- Encryption settings – This enables encrypting the data on the storage system. But for our case, encryption settings is not enabled.
The following snapshot shows the azure data lake storage service created.
Creating Azure Data Lake Analytics Service
Then create the analytics service. Click create a resource option, and search for data lake analytics service. Provide the necessary details and create the analytics service.
- Service Name
- Subscription
- Resource group
- Location
- Data Lake Storage account - While creating this analytics service, data lake storage account should also be linked for processing the data.
- Pricing Package – Click on the information icon to know more about the pricing packages available. I prefer going with pay-as-you-go option, since we are working on POC.
The following snapshot shows the data lake analytics service being created.

In the next article, we will see the flow, and how data could be processed. Also, let us work on creating a sample U-SQL script for processing the data lake storage files using data lake analytic service.