Showing posts with label Azure. Show all posts

Sunday 28 June 2020

Model Driven PowerApp: 360 Degree View Dashboard to Monitor Data from External Systems (Azure AD and Azure Cosmos DB)

Problem: The business dealership information is being captured on multiple external systems. There is a need for business to capture 360° data view dashboard to keep track of information of dealers, sales data, and many other dealership information at one place. And this dashboard is for business users on the organization for monitoring.

Let us take an example of dealership architecture, where dealer identities/domain information are stored on external Azure AD, and basic details of dealership is stored on Azure Cosmos database.

Note: The dealership use case is an example for us to explore the possibilities. Similarly, this can be replaced with any other data model.

Design & Solution Considerations


The following elements/components are considered for building this solution.
  • Azure Cosmos Database, which holds dealership’s basic information 
  • Azure Active Directory, which holds the domain/identity information of dealership users [This is external/separate domain, holding only dealership users] 
  • Power Automate, to integrate and push the data to CRM system. 
  • Microsoft Common Data Service, which acts as intermediate storage and containing subsets of information from two other systems. [Azure Cosmos DB and Azure AD] 
  • Power Apps – model driven app, which has necessary dashboard for business users. 

The following shows high level design of 360 degree architecture, integrating data from multiple systems.
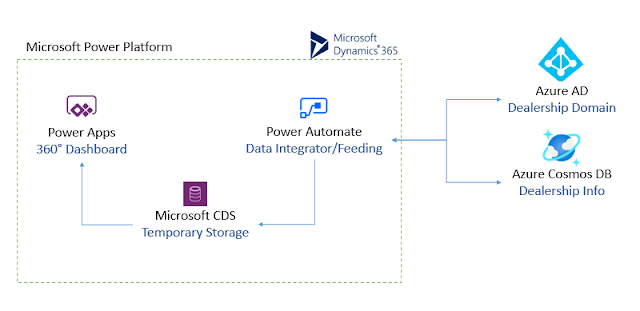
High level design for Dashboard providing 360 degree of dealership data

The following illustrates the design.
  • The necessary data model or entities are created on Microsoft CDS to capture the data from multiple system. For now in this usecase, let us focus on one entity, I.e., dealers.  
  • The flow configured on Power Automate runs as a scheduled job, to synchronize the data into CDS. Pulls minimal information from Azure AD and Azure Cosmos database, and synchronize the data subset into Microsoft CDS.  
  • Power Apps, which has views, forms and dashboards pulls and shows the information from entities, which is configured in the underlying CDS. 

Now let us get deeper into the solution, to see how these are configured.

Saturday 21 March 2020

Azure Web App – Integrate Microsoft Teams Channel and show Conversation highlights with MS Graph API endpoints

This article helps you out integrating the Microsoft Teams channel data into custom web applications. Assume an use case, web application has channel mapping, where the app interface needs to show the highlights of latest conversations from respective team channels.

Currently the graph endpoint which exposes the channel messages is beta and available as protected endpoints.

Note: Microsoft Team restricts more sensitive data, and integrate the endpoints if there is a need. Please read out the following notes for the integration guidance.
  • This article little focuses on information about integrating protected APIs. As of today, Microsoft has restricted integrating some of their beta APIs. The protected endpoint list is shown here. https://docs.microsoft.com/en-us/graph/teams-protected-apis
  • To enable the protected APIs for integration, you would need to reach out to Microsoft team for integrations. The request could be submitted through this form. https://aka.ms/teamsgraph/requestaccess
  • The request is generally reviewed, approved and enabled over a timeline mentioned in the article. 
  • The request form needs to be filled with tenant, Azure AD app (explained below) and other details. 
  • Once the request is approved, you will get a notification over email confirming the API enablement within specific timeline. 


Azure AD App Registration and Configuration


Before submitting the request, an Azure AD app needs to be registered on the tenant. The use case requires to get the channel conversations. So, the following snapshot shows the configured and granted permissions. Apart from this configuration, the other key parameters needs to be configured.
  • Enabling oAuth implicit flow. 
  • Enabling implicit tokens 
  • And providing redirect APIs. 
API permissions required for integration


Sunday 8 March 2020

Search for Documents from Microsoft Teams Channel Conversations

This article illustrates a sample for finding the documents available on a team, with keyword search from channel conversations. This is achieved with the help of outgoing webhook service, where documents from Team are being pulled with the help of Microsoft Graph API.
#Azure #GraphAPI #MicrosoftTeams #Office365

The following screenshot shows the list of documents retrieved sending the keyword via the channel conversation.
Finding documents from channel using outgoing webhooks

Tuesday 3 September 2019

Analyse and Enable Users to Adopt to Microsoft Teams early

As we are marching towards the transition phase from Skype to Microsoft Teams, let us look how you could enable/advice users to adopt to new technology early. The article helps you understand how you could automate the process of identifying users who are not of Microsoft Teams system, and sending them reminders to adopt to the latest technology. The approach explained here is one way of identifying and enabling users to adopt to Teams sooner. There are multiple ways to enable such adoptions.


Scenario


Let us first see how technically you could identify users and notify users on the usage. For this process, we will leverage Azure Logic Apps to create automated flows to identify the user pattern (usage and reports). The usage reports will be available on the Office 365 user activity reports. To access and manipulate the user patterns, we could leverage Microsoft Graph with necessary permissions.

As an example, we will consider logged in date as a parameter for this process. We will initially analyse the Microsoft team’s usage statistics on Office 365 report center and look for user logged in activity. If there are no activity present for any user, we will trigger an automated email for earlier adoption. Let us create a flow to achieve the entire process.

The below picture depicts the high level flow. In the below section, we will see each and every action in detail.
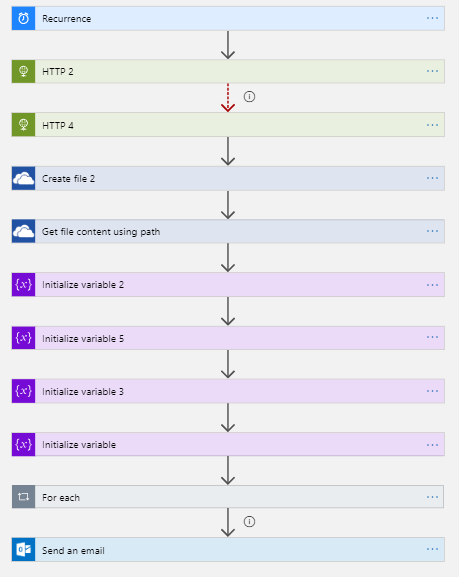
Azure Logic Apps Flow - To Identify Users not using Teams and Send Automated Mails

Saturday 25 May 2019

Accessing SharePoint Data with SPFx User Tokens via Service Layers - Part II

We are looking at getting user tokens retrieved from SPFx solutions, and leveraging the tokens on Azure service layers to access the SharePoint data on behalf of user.

So far, we have seen [link]
  • Creating SPFx solution by mapping necessary permissions to the package-solution.json file. 
  • Tuning the code, to get the access code for Microsoft Graph resources.

Here, by end of this reading, you will get to know how to use the token on Azure service to get access to SharePoint data.


Deploy & Approve Permissions:


Open the created SPFx solution and deploy the solution, before even testing the code on workbench. As the component requires permissions for accessing the data on SharePoint, the permissions requested should be approved before accessing. Once the component is deployed, the required permissions will be listed for approval under admin portal’s API management section.

In my case, the admin portal URL for approving necessary permissions will be
https://nakkeerann-admin.sharepoint.com/_layouts/15/online/AdminHome.aspx#/webApiPermissionManagement

Tuesday 21 May 2019

Accessing SharePoint Data with SPFx User Tokens via Service Layers - Part I

Let us have a detailed look at using the SharePoint SPFx user tokens, outside the SharePoint environments.

Why is it necessary to use the user tokens? To get to access the SharePoint data from third party services with user context. The scenario is explained below.

Usecase/Scenario: 

SPFx component accessing the SharePoint data via service layers with same user context : Weird scenario? Yes, it is very much needed in some cases like chat bot implementations or in other business processes. Say, You are working on the SharePoint component, and you need to pull data from SharePoint, but via other service like Azure services (See, we are not accessing SharePoint data directly from SharePoint component). In this case, your Azure service needs to authenticate with the SharePoint tenant, on behalf of you. That could be done by passing the oAuth tokens from SPFx to Azure service.

The flow will be as follows.
  • Create SPFx solution and map the necessary permissions on the package file.
  • Develop SPFx code, that communicates with AAD token provider and acquires the user token.
  • Pass the token to service layers like Azure Services. [This is not explained in this post. Based on the requirements, the service layer call could change. For example, if it is endpoint accessible using the endpoint, the normal REST call could be sufficient to get it working]
  • Azure service accesses the SharePoint data using the token available.
  • Azure service responds back to SPFx component with relevant data. [This is not explained in this post]

Monday 1 April 2019

Using Azure Devops & Github to Automate SPFx solution Packaging Processes for MS Teams and SharePoint

In this article, we will understand how SPFx solutions built for MS Teams and SharePoint portals, could be automatically packaged and uploaded into app catalog portals. This automation is achieved with the help of Azure Devops and Github version control systems. Using devops ensures us the continuous delivery of changes onto the target platforms.
  
Remember, we will be targeting the webparts of this solution for SharePoint and as tabs for Microsoft Teams. Let us use github repositories as a version control tool for storing the solution. You will understand, how github could be easily integrated with Azure Devops for automating the packaging processes in this article. 

Create the SPFx solution, that is compatible for SharePoint online portals. The SPFx solution (available on the github https://github.com/nakkeerann/globalspfxsoln) contains, the azure-pipeline configuration file template for setting up the build pipelines. The following snapshot shows the configurations for creating SPFx solution. 

Push the code into Github using the git commands. For example, below commands are used for my repository.
git initgit add .git commit -m "first commit"git remote add origin https://github.com/nakkeerann/globalspfxsoln.gitgit push -f origin master


Install the Azure Pipelines to your Github account https://github.com/marketplace/azure-pipelines . Select the repositories required to install pipelines. Authorize azure pipelines. 

Friday 15 March 2019

Office365 SharePoint: Validate & Transform XML Data from Enterprise Systems into SharePoint using Azure Logics App

In this article, you will understand how the XML content from enterprise systems is first validated and converted/transformed to JSON, and pushed to Office 365 SharePoint online lists. We will be leveraging the power of Azure services, to achieve everything with just configurations.

The services used under Azure will be
  • Logics App
    • The entire flow will be set here. 
  • Integration account.
    • With in integration account, we will store the schema and map files to validate and transform the data.

In my previous article, you have seen how the JSON content from enterprise systems is flowing into SharePoint online. There, we have not focused on validating the JSON data, since HTTP trigger by default validates.

We have seen the introduction to the features being leveraged in the previous article. Let us get directly into the business scenarios.


Business Scenario


Assume an enterprise system exposes XML data to multiple systems. We will consider source system to be HTTP service (for our POC) and the target system to be SharePoint. The XML data from source system cannot be directly feed into SharePoint. For this purpose, we need to transform the XML content, into the required format. The following picture depicts the transformation. The data being transformed is a SharePoint list item entry, along with metadata properties required for the list item.
Data Representation between two systems. Left - XML data from HTTP service, and Right - JSON data compatible for SharePoint
Data Representation between two systems. Left - XML data from HTTP service, and Right - JSON data compatible for SharePoint list

Wednesday 27 February 2019

Office365 SharePoint : Converting Enterprise System Data using Azure Integration Account Map Component and Logic Apps

This article explains the advantages of using Azure Integration account along with Azure Logics App for integrating enterprise systems with Office 365 SharePoint.  


Azure Integration Account & Logic Apps:


Azure Integration account provides ways to store and manage the components/artifacts, that includes agreements, maps, schemas, etc. In this article, let us look at leveraging maps component and also look at advantages of using it.  

Maps component is used for mapping the data from one system into another system. The mapping of two systems, those using different form of data. These scenarios are handled by using liquid template mapping or XSLT mapping formats. Here in this article, liquid templates are used for mapping the data. 

Azure Logic apps is leveraged to explain the enterprise integrations scenarios, along with usage of Azure Integration account’s map. In the scenarios explained below, I have shown the data flow between HTTP service and SharePoint for easy understanding. 


Business Scenario & Mapping:


We are considering two services. One HTTP services that uses JSON for representing the data, and other SharePoint REST API that again uses JSON to represent the data. But there is variation in format that is being used between these two services. Say for example, we are using services to move the book details from one HTTP post request to SharePoint. The following picture depicts the data transformation. 
Data Representations between two services/systems
Data Representations between two services/systems considered
Note: Assume HTTP service as another system, which posts data. For our easy/better understanding, i have simplified the logic with simple data representations.

Saturday 9 February 2019

Analyze Office 365 SharePoint online Data using Azure Data Lake Storage and Analytics Service – Part II

In this article, we will understand how Microsoft flow can be configured to push the data from Office 365 SharePoint list into Azure Data Lake Storage service. We could also understand, how the data can be analyzed using the Azure Data Lake Analytics service.

In the previous article, you could understand the benefits of using Azure Data Lake Storage & Analytic services. Also, it helps configuring these two Azure services.


Setting up Microsoft Flow 


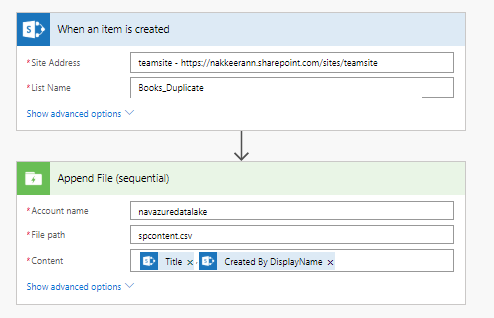
  • Login to the Microsoft Flow Portal. Go to my flows, and select create flow from blank option. The following snapshot shows the flow being configured.
MS Flow steps to push Data From SharePoint to Azure Data Lake Storage

Friday 1 February 2019

Analyze Office 365 SharePoint online Data using Azure Data Lake Storage and Analytics Service – Part I

This article series helps you understand pushing the data from SharePoint online into the Azure Data Lake Storage, then making data available for analytics services. We could get to know the benefits of using Azure Data Lake storage and Data Lake analytics service.


The following steps are created and configured for the flow.
  • Create Azure Data Lake Storage 
  • Create Azure Data Lake Analytics 
  • Configure Microsoft Flow to push data into Azure Data Lake Storage 
  • Configure Azure Data Lake Analytics service to process the storage data. 

Note: There might be plenty ways to integrate the data into the Azure Data Lake storage. But here, let us leverage Microsoft flow for easily pushing data from one system to another. It is just a two step process.


Why Azure Data Lake Storage & Analytics? 


Before building the solution, let us know the benefits of using these services. Azure Data Lake storage is primarily used for processing big data analytics. The services/solution works around big data, can be easily integrated with the Azure Data Lake storage service. This will be optimized storage for big data work analytics workloads. The data stored into the Azure data lake store, are in the form of hierarchical file system.

Wednesday 28 November 2018

Serverless Azure WebJobs - Triggers to Push Data from Azure Storage into Office 365 SharePoint

Let us look how we can leverage the power of azure cloud storage, and integrate data into Office 365 SharePoint. In this article, we will use serverless WebJobs to push the data into Office 365 SharePoint online, whenever new content is added to storage systems like queues and blobs.

Scenario: Azure cloud storage system is used as centralized platform for storing/publishing the content. Office 365 SharePoint to get the content, whenever the data is available on the cloud storage.

Azure webjobs can be used for pushing the data to SharePoint systems/applications. We will be using Azure Webjob SDK framework, which has necessary triggers for queues and blobs, to trigger the content whenever it is available. We will be using OfficeDevPnp core libraries on Azure webjobs to integrate the data into Office 365 SharePoint.

This article explains trigger events for both queue and blob, present on Azure storage. But based on your requirement, you can select any of the storage.

The prerequisites required are,
  • Office 365 SharePoint
  • Azure Storage Account –  
    • Queues 
    • Blobs 
  • Azure App Service which has WebJobs 
  • Microsoft Visual Studio – This is optional, and you can use any other alternative approach. But in this case, I have used visual studio to build the solution and to deploy the solution directly to cloud. 

Friday 9 November 2018

Azure Functions with Office 365 SharePoint Calls - Creating, Debugging & Deploying NodeJS Functions using Visual Code - Part II

Here let us look at the debugging the azure function locally and deploying the function to the portal.

In the previous article, we have seen creating the Azure function and accessing the SharePoint data using NodeJS.

Since we are calling SharePoint authentication methods and SharePoint list APIs, we need to make sure that the function is not returning the response to client, before executing the authentication and rest API calls. This can be done using async and await keywords. By default, outer module function has the async function. In the azure function code, we need to append the await keyword for the calling code and async to the function present in the code.

async and await on the azure function code

Note:
The code available in the previous article doesnt have these keywords, i have left it to you for embedding for hands-on.

Thursday 1 November 2018

Azure Functions with Office 365 SharePoint Calls - Creating, Debugging & Deploying NodeJS Functions using Visual Code - Part I

Let us have a detailed look at creating azure functions using visual code, creating sharepoint context for getting site data, debugging locally using visual code, and deploying the code to Azure function app from visual code.


Creating Azure Function using Visual Code:


Setup and install the prerequisites for developing azure functions using visual code.
  • Install the visual code on your machine and install all prerequisites required for developing azure functions.
  • Install the latest of NodeJS.
  • Then install the core tools package required for working with Azure functions. 
npm install -g azure-functions-core-tools
The extensions being enabled on the visual studio can be found in the following snapshot.

Thursday 11 October 2018

Using Azure Functions, Cognitive Services and Flow for classifying Office 365 SharePoint Word Documents - Part II

Let us look how to integrate Azure Function, Cognitive services into Microsoft Flow for extracting tags/categories and update the SharePoint document item.

This article series helps us to work on a special use case of extracting information of word documents uploaded to Office 365 SharePoint libraries and then analyze/classify the document content using Azure Cognitive Services. Then update the document with classified data as tags/categories. The article links are shown below.


Extract Code From Github


The Azure function created in the previous article is available on Github repository (https://github.com/nakkeerann/analyze-sp-word-documents).
  • Clone the code from the github repository to the local. 
  • Open in visual studio and make necessary changes, like updating user credentials and SharePoint site and details.

Saturday 6 October 2018

Using Azure Functions, Cognitive Services and Flow for classifying Office 365 SharePoint Word Documents - Part I

This article series helps us to work on a special use case of extracting information of word documents uploaded to Office 365 SharePoint libraries and then analyze the document content using Azure Cognitive Services.

We have seen before extracting tags and metadata properties of image files from Office 365 SharePoint using Microsoft Flow and Azure Cognitive Services.

Microsoft Flow has a Get File content action, but that doesn't help extracting word documents content. Only it supports extracting content of notepad as straight forward approach. Since Microsoft Flow doesnt provide any option to read the word documents content, we will be using Azure Functions to extract the content. Once we have the content, we will use Azure Cognitive service to get the tags for the content extracted. Here Microsoft Flow is used to manipulate triggers and subsequent actions. So our algorithm is will be as follows.

High level architecture for classifying SharePoint Word Documents

Friday 6 July 2018

Analyze and Classify Images on Office 365 SharePoint using MS Flow and Azure Service

Let us see how the Office 365 SharePoint library images are analyzed using Microsoft Flow and Azure Cognitive Service. By analyzing the images, we can classify the images. Also, we can extract the image description, tags or taxonomy data of image, locations present on images, or even the image categories.

Azure Cognitive service provides Computer Vision API, which helps providing tools to understand the content of any images. Computer vision API helps in classifying the image, identifying captions of image and even image categorizations. Further API helps in recognizing celebrities and landmarks, reading out text from images, analyzing video in real time and generating thumbnails for the videos.

Computer vision API can be leveraged on multiple platforms. Microsoft Flow is one such powerful platform, where we integrate computer vision API for analyzing the images uploaded to SharePoint.

Use Case: Let us see how the images uploaded can be analyzed classified on SharePoint images library. At the end of article, you will know how the below image uploaded can be updated classification and description data.

Wednesday 23 May 2018

Creating Office 365 SharePoint Custom Connectors on Microsoft Flow

Here, let us look how the custom connectors can be created for accessing SharePoint data on Microsoft Flow.

Microsoft Flow provides multiple connectors from various services including SharePoint to work with the data. The connectors contain multiple triggers and actions. For SharePoint connector by Out of the Box, Microsoft provides 8 triggers and 28 actions on Microsoft flow.

UseCase: Imagine you want to retrieve the SharePoint user profile data of some user. Currently there is no action available for MS Flow developers to retrieve SharePoint user profile data. Such triggers and actions can be created by developers on the Microsoft Flow platform. In this post, let us look how one such custom action can be created and used on the Microsoft Flow platform.

The configuration involves the following steps.
  1. Configuring Azure AD Application, which provides necessary permissions and helps in authenticating the calls made from Microsoft Flow.
  2. Generating the collection file (Swagger) using postman tool, which will be used as base file while building the custom connector.
  3. Configuring the custom connector, which will make call to SharePoint to get the required data with necessary inputs.
  4. Testing the custom connector created above.
  5. Creating/Configuring the flow, which will also use the custom connector we have created above.


Configure Azure AD Application for Flow Authentications:


  • Create a new app on the Azure Active directory.

Sunday 6 May 2018

Content Classification on Office 365 SharePoint using MS Flow and LUIS

In this post, let us look how the Office 365 SharePoint list content can be classified using Microsoft Flow with the help of LUIS text prediction techniques. Text added to Office 365 SharePoint list are classified and saved back to SharePoint using Microsoft Flow and LUIS.

Consider a scenario of having queries list, and admin wants the queries to be auto classified before routing the queries for solution. Microsoft Flow provides a LUIS connector, which helps in predicting and classifying the text being saved to SharePoint.

Note: In a layman scenario on LUIS portal, categories will be intents and queries will be utterances.


Connecting SharePoint and LUIS using Flow


The solution consists of three steps.
  • Query is created on SharePoint: Flow is triggered, whenever a new item is created in the SharePoint list.
  • Query category is predicted using LUIS: Flow uses LUIS Get Prediction action for classifying the item created. The action predicts the data using the trained app created on the LUIS portal. The output of this step will be matching intents (predicted scores) with the relevant scores.
  • Query is updated with the category predicted: After classification, the top scoring intent from the above step is saved to the respective SharePoint list item’s category field.

Monday 16 April 2018

Speech Recognition on Office 365 SharePoint with Azure Cognitive Service Speech API

In this post, let us see how speech recognition can be implemented using Microsoft Speech API on SharePoint portals using JavaScript client side libraries/SDKs. This shows how speech to text can be converted on Office 365 SharePoint using Azure Cognitive Services.

In our previous post, we have seen implementing Speech recognition using browser SpeechRecognition objects on SharePoint portals. This post is special for those people who love implementing speech recognition using Microsoft Speech API (Azure Cognitive service speech API).

Note: If you are interested only in the implementation, scroll down to the bottom section. :)


Azure Cognitive Service - Bing Speech API


Microsoft Speech API supports both speech to text and text to speech conversions. In this case, only we are focusing on speech to text conversion. Microsoft Speech API provides two approaches of speech to text conversion. One using the REST API and the other way is using the client libraries. We will be leveraging the client libraries, which provides speech SDK bundles.