Wednesday, 26 June 2019

Capture and Document User Information with Image on SharePoint - Part II


This is second part of article on capturing and documenting user details on to Office 365 SharePoint. The previous article shows setting up the Microsoft Flow to capture and creation of document with user details.
In this article, recording of user details is discussed. PowerApps forms are used to capture the user details. The details includes user name, picture, etc. Then integrating the form with Microsoft Flow is discussed.


Setting up the User Form

In my scenario, there are only two user entries recorded.
  • User Name
  • User Picture
Let us set the form.
  • Navigate to PowerApps portal/ app, and then select blank app.
  • From insert option, select two screens-
    • New blank screen - For user input
    • New Success screen - For showing user success message.
Screens & Controls Configured on the Form

Tuesday, 18 June 2019

Capture and Document User Information with Image on SharePoint - Part I


In this article, let us see how user details including user picture could be captured and saved onto SharePoint as documents using PowerApps and Microsoft Flow.

Here is the detailed scenario: User details like Name, picture, etc. needs to be captured and documented, and has to be made available on SharePoint. This process could be automated with the help of Office 365 SharePoint, PowerApps and Microsoft Flow.

The following points depicts this automated flow.
  • Using PowerApps, Custom Form needs to be created showing the required fields.
  • Microsoft Flow will be used to capture the information entered into the Form.
  • The flow once captures the information, it will format the data and creates the document, before saving it to SharePoint. 
    • Creation of documents is not straight forward approach. So in this case HTML file needs to be created. [The proper formatting could be done by taking HTML file creation approach.] 
    • Then HTML file is converted into required format. Then the target document could be uploaded into SharePoint library.
Note: One Drive for Business connectors provides necessary actions for creation and conversion of documents. The same will be leveraged in this samples.

Saturday, 25 May 2019

Accessing SharePoint Data with SPFx User Tokens via Service Layers - Part II

We are looking at getting user tokens retrieved from SPFx solutions, and leveraging the tokens on Azure service layers to access the SharePoint data on behalf of user.

So far, we have seen [link]
  • Creating SPFx solution by mapping necessary permissions to the package-solution.json file. 
  • Tuning the code, to get the access code for Microsoft Graph resources.

Here, by end of this reading, you will get to know how to use the token on Azure service to get access to SharePoint data.


Deploy & Approve Permissions:


Open the created SPFx solution and deploy the solution, before even testing the code on workbench. As the component requires permissions for accessing the data on SharePoint, the permissions requested should be approved before accessing. Once the component is deployed, the required permissions will be listed for approval under admin portal’s API management section.

In my case, the admin portal URL for approving necessary permissions will be
https://nakkeerann-admin.sharepoint.com/_layouts/15/online/AdminHome.aspx#/webApiPermissionManagement

Tuesday, 21 May 2019

Accessing SharePoint Data with SPFx User Tokens via Service Layers - Part I

Let us have a detailed look at using the SharePoint SPFx user tokens, outside the SharePoint environments.

Why is it necessary to use the user tokens? To get to access the SharePoint data from third party services with user context. The scenario is explained below.

Usecase/Scenario: 

SPFx component accessing the SharePoint data via service layers with same user context : Weird scenario? Yes, it is very much needed in some cases like chat bot implementations or in other business processes. Say, You are working on the SharePoint component, and you need to pull data from SharePoint, but via other service like Azure services (See, we are not accessing SharePoint data directly from SharePoint component). In this case, your Azure service needs to authenticate with the SharePoint tenant, on behalf of you. That could be done by passing the oAuth tokens from SPFx to Azure service.

The flow will be as follows.
  • Create SPFx solution and map the necessary permissions on the package file.
  • Develop SPFx code, that communicates with AAD token provider and acquires the user token.
  • Pass the token to service layers like Azure Services. [This is not explained in this post. Based on the requirements, the service layer call could change. For example, if it is endpoint accessible using the endpoint, the normal REST call could be sufficient to get it working]
  • Azure service accesses the SharePoint data using the token available.
  • Azure service responds back to SPFx component with relevant data. [This is not explained in this post]

Tuesday, 7 May 2019

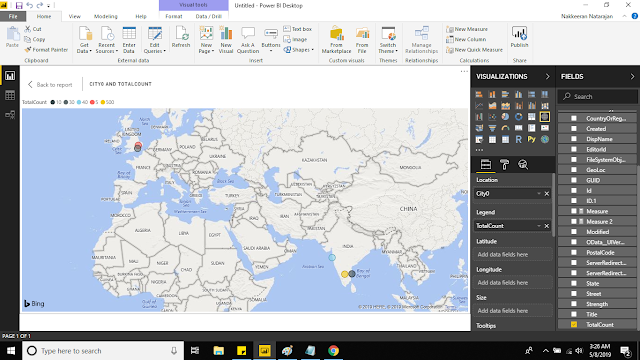
Power BI Reports with Map Visualizations For Office 365 SharePoint List Data

Let us look how to integrate and show the Office 365 SharePoint data on to Power BI reports. In this specific use case, we will look how to SharePoint data as map views.

Consider a very basic scenario of showing organization location-wise user count on Power BI dashboards. So in this case, the organization data is available as SharePoint list, and consider only two parameters, that is location and user count.

The below snapshot shows the data loaded onto Power BI. Let us see step by step approach below.
PowerBI showing the SharePoint List Data as Locations on Map Visuaization
PowerBI Report showing the SharePoint List Data as Locations on Map Visualization