Tuesday 24 May 2016

Working With SharePoint Web Scope Features Using CSOM PowerShell


In this article, you will learn how retrieve, enable or disable the site level features (web scope) programmatically using CSOM with PowerShell on SharePoint 2013 / SharePoint 2016 / SharePoint online. This article applies to features present on web scope or sub sites level.


Steps Involved:


The following prerequisites need to be executed before going for any operations using CSOM PowerShell on SharePoint sites.
  1. Add the references using the Add-Type command with necessary reference paths. The necessary references are Microsoft.SharePoint.Client.dll, Microsoft.SharePoint.Client.Runtime.dll.
    1. Add-Type -Path "C:\Program Files\Common Files\microsoft shared\Web Server Extensions\16\ISAPI\Microsoft.SharePoint.Client.dll"   
    2. Add-Type -Path "C:\Program Files\Common Files\microsoft shared\Web Server Extensions\16\ISAPI\Microsoft.SharePoint.Client.Runtime.dll"   
  2. Initialize client context object with the site URL.
    1. $siteURL = ""    
    2. $ctx = New-Object Microsoft.SharePoint.Client.ClientContext($siteURL)  
  3. If you are trying to access SharePoint Online site, then you need to setup the site credentials with credentials parameter and get it set to the client context.
    1. #Not required for on premise site - Start    
    2. $userId = ""    
    3. $pwd = Read-Host -Prompt "Enter password" -AsSecureString    
    4. $creds = New-Object Microsoft.SharePoint.Client.SharePointOnlineCredentials($userId, $pwd)    
    5. $ctx.credentials = $creds    
    6. #Not required for on premise site - End   
  4. If you are trying to access the SharePoint on premise site, then the credentials parameter is not required to be set to the context. But you need to run the code on the respective SharePoint server or you need to pass the network credentials and set the context.
    1. #Credentials for on premise site - Start    
    2. $pwd = Read-Host -Prompt "Enter password" -AsSecureString    
    3. $creds = New-Object System.Net.NetworkCredential("", $pwd)    
    4. $ctx.Credentials = $creds    
    5. #Credentials for on premise site - End   


Get Active Site Level Features (Web Scope):

  • Initialize the web object and get the web property.
  • Get the features from web object using features property.
  • Load the objects and execute query to get the data.
  • Get the feature details individually using for each loop.

    • For each web feature, use the retrieve method to get the appropriate property value. In this case, feature display name will be retrieved.
    • Load the web feature object and execute the query. Then access the feature properties. The feature properties retrieved are feature id and feature name.
      1. function GetWebFeatures(){      
      2.     # Access the web      
      3.     $web = $ctx.Site.OpenWeb("/SharePoint")      
      4.     # Get the features      
      5.     $webFeatures = $web.Features      
      6.     $ctx.Load($web)      
      7.     $ctx.Load($webFeatures)      
      8.     $ctx.ExecuteQuery()          
      9.           
      10.     foreach($webFeature in $webFeatures){      
      11.         # Set the property name to retrieve the value      
      12.         $webFeature.Retrieve("DisplayName")      
      13.         $ctx.Load($webFeature)      
      14.         $ctx.ExecuteQuery()      
      15.         Write-Host $webFeature.DefinitionId      
      16.         Write-Host $webFeature.DisplayName      
      17.     }      
      18. }   


Get/Check Site level Feature Properties/Status (Web Scope):

Here we will see how we can get the particular feature and check whether the site feature (web scope) is active or not.
  • Get the feature id from the Microsoft site. The scope of the feature should be web.
  • Get the feature using GetById method with feature id.
  • Use the retrieve method to get the appropriate property value.
  • Load the feature and execute the query.
  • Using if else condition, identify whether the site feature is active. If the feature id or name exists from the above object, then the feature is in active mode.
    1. function GetWebFeature(){      
    2.     # Set Feature ID          
    3.     $web = $ctx.Site.OpenWeb("/SharePoint")    
    4.     $checkFeature = $web.Features.GetById($webFeatureId)      
    5.     $checkFeature.Retrieve("DisplayName")      
    6.     $ctx.Load($checkFeature)      
    7.     $ctx.ExecuteQuery()      
    8.           
    9.     if($checkFeature.DefinitionId -eq $null){      
    10.         Write-Host "Web Scope Feature is not active"      
    11.     }      
    12.     else{      
    13.         Write-Host $checkFeature.DisplayName "Web Scope Feature is active"      
    14.     }      
    15. }   


Activate the site level feature (Web Scope):

In the above section, we have seen how we can check the status of the site level feature. Here we will see how we can activate the feature which is already installed on the site.
  • To activate the web feature, use the add method method to the features collection. The necessary parameters are feature id, boolean value to force enable the feature and the scope. The scope here will be none, since we are already adding the feature to web object. Boolean value is true to force enable the feature.
  • Use the retrieve method to get the appropriate property value.
  • Load the feature object and execute the query.
  • Check the definition id, if definition id is not null then the site collection feature is activated.
    1. # Activate the site level feature (Web Scope)    
    2. function EnableWebFeature(){      
    3.     try{      
    4.         $web = $ctx.Site.OpenWeb("/SharePoint")            
    5.         # Add the feature using feature id and scope.      
    6.         $newWebFeature = $web.Features.Add($webFeatureId, $true, [Microsoft.SharePoint.Client.FeatureDefinitionScope]::None)      
    7.         $newWebFeature.Retrieve("DisplayName")      
    8.         $ctx.Load($newWebFeature)      
    9.         $ctx.ExecuteQuery()      
    10.         if($newWebFeature.DefinitionId -ne $null){      
    11.             Write-Host $newWebFeature.DisplayName "Web scoped Feature activated"      
    12.         }              
    13.     }      
    14.     catch{      
    15.         Write-Host "Error in activating web scoped feature : $($_.Exception.Message)" -ForegroundColor Red      
    16.     }      
    17. }   


Deactivate the Site level feature (Web Scope):

In the above section, we have seen how we can activate the site level feature. Now we will see how we can deactivate the site level feature.
  • To de-activate the site level (web) feature, use the remove method to the features collection. The necessary parameters are feature id, boolean value to force enable the feature. The feature id can be identified from the microsoft blog site (mentioned above). Boolean value is true to force disable the feature.
  • Load the web object and execute the query.
    1. # Deactivate the site level feature (Web Scope)    
    2. function DisableWebFeature(){      
    3.     try{      
    4.         $web = $ctx.Site.OpenWeb("/SharePoint")      
    5.         $web.Features.Remove($webFeatureId, $true)      
    6.         $ctx.Load($web)      
    7.         $ctx.ExecuteQuery()      
    8.         Write-Host "Web Feature deactivated"      
    9.     }      
    10.     catch{      
    11.         Write-Host "Error in deactivating web scoped feature : $($_.Exception.Message)"-ForegroundColor Red      
    12.     }      
    13. }    


Note:
 The above set of operations needs to be called to get it executed.
    1. # Feature to be activated    
    2. $webFeatureId = "94c94ca6-b32f-4da9-a9e3-1f3d343d7ecb" # SharePoint Server Publishing    
    3.     
    4. GetWebFeatures # Gets all the features from web scope.    
    5. GetWebFeature # Gets a feature using feature id at web scope.    
    6. EnableWebFeature # Adds web feature.    
    7. DisableWebFeature # Removes web feature.   
Monday 23 May 2016

Create, Retrieve, Update Or Delete List Views Using CSOM with PowerShell On SharePoint Online


In this article, you will learn how we can retrieve, create, update or delete list views using CSOM with PowerShell. This is mainly focused on using PowerShell scripts for SharePoint online sites.

Get Views:


First we will see how we can get the existing views available on the SharePoint site. The steps followed here are very similar to the steps following CSOM or JSOM programming.
  1. Initialize context object with the site URL parameterThen initialize the SP Online Credentials with the above parameters and set it to the context.
  2. Then access the list using the context and then the views from the list, load the objects and execute the query.
  3. Loop through the result object and get the necessary view information.
    1. $siteURL = ""  
    2. $userId = ""  
    3. $pwd = Read-Host -Prompt "Enter password" -AsSecureString  
    4. $creds = New-Object Microsoft.SharePoint.Client.SharePointOnlineCredentials($userId, $pwd)  
    5. $ctx = New-Object Microsoft.SharePoint.Client.ClientContext($siteURL)  
    6. $ctx.credentials = $creds  
    7. try{  
    8.     $list = $ctx.web.Lists.GetByTitle("TestList")  
    9.     $views = $list.views  
    10.     $ctx.load($views)  
    11.     $ctx.executeQuery()  
    12.     foreach($view in $views){  
    13.         write-host $view.Title  
    14.     }  
    15. }  
    16. catch{  
    17.     write-host "$($_.Exception.Message)" -foregroundcolor red  
    18. }  
This will get all the view names available for the list on the site. Next, we will see how we can get one particular list on the site. 

Get View:

The operations are similar as the above section. After getting the list views, get the particular view using GetByTitle method.
  1. $siteURL = ""  
  2. $userId = ""  
  3. $pwd = Read-Host -Prompt "Enter password" -AsSecureString  
  4. $creds = New-Object Microsoft.SharePoint.Client.SharePointOnlineCredentials($userId, $pwd)  
  5. $ctx = New-Object Microsoft.SharePoint.Client.ClientContext($siteURL)  
  6. $ctx.credentials = $creds  
  7. try{  
  8.     $list = $ctx.web.Lists.GetByTitle("TestList")  
  9.     $view = $list.views.GetByTitle("CustomView")  
  10.     $ctx.load($view)  
  11.     $ctx.executeQuery()  
  12.     write-host $view.Title  
  13. }  
  14. catch{  
  15.     write-host "$($_.Exception.Message)" -foregroundcolor red  
  16. }  

Create View:


Here we will see how we can create a list view. The following steps depict the flow.
  1. Initialize context object with the site URL parameterThen initialize the SP Online Credentials with the above parameters and set it to the context.
  2. Initialize the ViewCreationInformation object.
  3. Set the required parameters for new view. The necessary parameters are view name, type and view fields.
  4. Add new view to the view collection. Then Load and execute the query.
    1. $siteURL = ""  
    2. $userId = ""  
    3. $pwd = Read-Host -Prompt "Enter password" -AsSecureString  
    4. $creds = New-Object Microsoft.SharePoint.Client.SharePointOnlineCredentials($userId, $pwd)  
    5. $ctx = New-Object Microsoft.SharePoint.Client.ClientContext($siteURL)  
    6. $ctx.credentials = $creds  
    7. try{  
    8.     $list = $ctx.web.Lists.GetByTitle("TestList1")  
    9.     $views = $list.views  
    10.     $viewInfo = New-Object Microsoft.SharePoint.Client.ViewCreationInformation  
    11.     $viewInfo.Title = "CustomView"  
    12.     $viewInfo.ViewTypeKind = [Microsoft.SharePoint.Client.ViewType]::None  
    13.     $viewInfo.ViewFields = @("ID""Title""Author")  
    14.     $view = $views.Add($viewInfo)  
    15.     $ctx.load($view)  
    16.     $ctx.executeQuery()  
    17.     write-host $view.Title  
    18. }  
    19. catch{  
    20.     write-host "$($_.Exception.Message)" -foregroundcolor red  
    21. }  
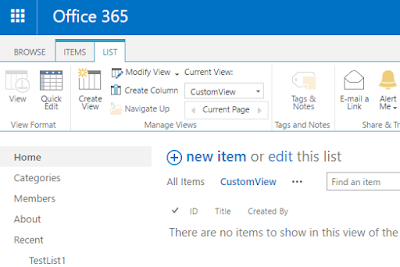
The view will be added to the list. You will now see the view name changes. The following shows you the snapshot.

Delete List View:


Here we will see how we can delete the list view. The following steps depict you the flow. 
  1. Initialize context object with the site URL parameterThen initialize the SP Online Credentials with the above parameters and set it to the context.
  2. Get the list using GetByTitle method and then get views. From the view collection, find out the view to be deleted using GetByTitle method.
  3. Then, remove the view using the delete object method.
  4. Using the context, execute the query.
    1. $siteURL = ""  
    2. $userId = ""  
    3. $pwd = Read-Host -Prompt "Enter password" -AsSecureString  
    4. $creds = New-Object Microsoft.SharePoint.Client.SharePointOnlineCredentials($userId, $pwd)  
    5. $ctx = New-Object Microsoft.SharePoint.Client.ClientContext($siteURL)  
    6. $ctx.credentials = $creds  
    7. try{  
    8.     $list = $ctx.web.Lists.GetByTitle("TestList")  
    9.     $views = $list.views  
    10.     $view = $views.GetByTitle("CustomView")  
    11.     $view.DeleteObject()  
    12.     $ctx.executeQuery()  
    13.     Write-Host "View Deleted"  
    14. }  
    15. catch{  
    16.     write-host "$($_.Exception.Message)" -foregroundcolor red  
    17. }  
The view will be deleted from the list.

Update List View:


Here we will see how we can update the list view. The following steps depict you the flow.
  1. Initialize context object with the site URL parameterThen initialize the SP Online Credentials with the above parameters and set it to the context.
  2. Get the list using GetByTitle method and then get views. From the view collection, find out the view to be updated using GetByTitle method.
  3. In my case, I am trying to add a field to the view (Update Operation). You can do your own custom operation with your custom logic here.
  4. Then, update the view using the update method.
  5. Using the context, execute the query.
    1. $siteURL = ""  
    2. $userId = ""  
    3. $pwd = Read-Host -Prompt "Enter password" -AsSecureString  
    4. $creds = New-Object Microsoft.SharePoint.Client.SharePointOnlineCredentials($userId, $pwd)  
    5. $ctx = New-Object Microsoft.SharePoint.Client.ClientContext($siteURL)  
    6. $ctx.credentials = $creds  
    7. try{  
    8.     $list = $ctx.web.Lists.GetByTitle("TestList1")  
    9.     $views = $list.views  
    10.     $view = $views.GetByTitle("CustomView")  
    11.     $viewFields = $view.ViewFields  
    12.     $viewFields.Add("Created")      
    13.     $view.Update()  
    14.     $ctx.executeQuery()      
    15. }  
    16. catch{  
    17.     write-host "$($_.Exception.Message)" -foregroundcolor red  
    18. }  
The view will be updated.